OS Generator for LinTO on Raspberry Pi
Interactive generation / customization tools using ARM emulation in Chroot.
Get the tool here : LinTO-OS-Generator
This repository contains system configurations and parameters that can be used to build modular system images that runs directly on a Raspberry PI3, compute module3 or later boards.
Prebuilt image
Configured user : pi
Configured password : pi
Link for this prebuilt image will come fast. Watch for it.
Usage of this prebuilt Raspberry Pi OS image documented in the Quickstart tutorial
Prerequisites of the host machine
In order to be able to manipulate ARM images directly on an AMD64 / x86_64 desktop computer, we use the qemu emulator. Thus the ARM binaries can be executed on the system running the generator.sh scripted tool. To install qemu :
sudo apt-get install qemu-system-arm qemu-user-static kpartx
ARM cross compilation
You can use this tool to customize an existing ARM Linux image mounted as loopback device. Once "mounted and prepared" you can chroot into the image and work inside of it. You might want to apt-install some stuff using ARM apt repositories, you can also build and compile programs using ARM gcc...
Usage
Tip You might follow these steps to customize some files in this repo before running the gnerator.sh script
- Wifi
Put correct values for your network in :
./wifi/root_part/etc/wpa_supplicant/wpa_supplicant.conf
- SSH keys (useful for starting a ReverseSSH from your LinTO to any remote server), see contents in :
./base/root_part/home/pi/.ssh/
The LinTO private key shall be ./base/root_part/home/pi/.ssh/id_rsa with a chmod 600
- Start building your image using :
./generator.sh <origin_image.img> <new_image.img> and follows the instructions
Configuration
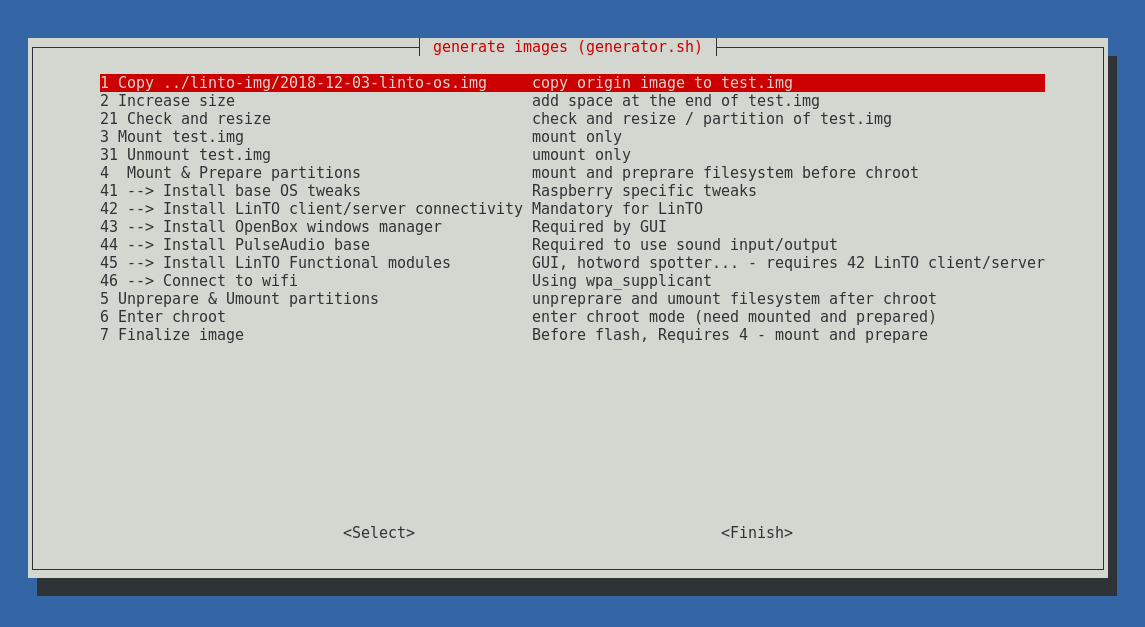
To create a LinTO image, follow the next steps :
- Use 1 to copy the origin image to the new image
- Use 4 to mount and prepare partitions before Chroot
- Use 4.1 and 4.2 to install last raspbian packages
- Use 4.xx to automatically download and install our latest distribution of binaries (see prebuilt binaries)
- Use 6 to enter chroot and manipulate the filesystem (insall custom packages, cross-compile ARM programs...)
- Use 7 to finalize the installation
Tip At any point of the image building process, you can enter the chroot and manipulate freely anything your image being built.
LinTO Serial number and server address (pairing with LinTO platform)
(You need to use "enter chroot" once "mount and prepare" is done in the generator script)
Your LinTO needs an unique serial number to get recognized by the server stack. Once LinTO Client stack is installed while generating the OS, you need to edit the LinTO-Client config file in /home/pi/linto-client/terminal/linto.json and put the correct values (server address, serial number...).
You're done !
You can flash your SD card with this whole new image ! Don't forget to expand your filesystem on the target Raspberry Pi device.
Soundcard
You might use any USB soundcard (Jabra speak for instance)... or a platform specific sound-card like Seeed Respeaker Pi Hat modules. If you want to use this kind of sound-cards, LinTO won't start functional services,like GUI or keyword spotter, until the sound-card is properly attached to the system (install drivers first !).
Raspberry Internal soundcard is disabled in our OS. It shall get enabled... but won't provide any sound input.
If no sound-card is installed, LinTO will boot to a console prompt (where you can install your soundcard driver). Use an external keyboard and CTRL+ALT+F1,F2,F3... to circle through local consoles.
Raspberry LCD screen rotation
See : #lcd_rotate=2 in /boot/config.txt (inside chroot) or ./base/boot_part/config.txt before creating image.
Notes
- https://enavarro.me/emuler-un-raspberry-pi-avec-qemu.html
- https://docs.docker.com/engine/installation/linux/docker-ce/debian/#install-from-a-package
- You can download the latest raspbian lite image here : https://downloads.raspberrypi.org/raspbian_lite_latest