Post install walkthrough
This section intends to describe generic functionnalities of your deployed LinTO Platform Server Stack and how to manage them .
If you have a specific usage in mind, maybe you'll want to use dedicated walkthroughs listed bellow :
🗃️ Transcription service(s) management
6 items
Prerequistes
- You have a functionnal LinTO Server Platform Stack running on a server.
- You have a mean to access the server by a Domain Name (DNS server / DNS Record / entries in /etc/hosts ...)
- This DNS entry is the one configured in
LINTO_STACK_DOMAINenv variable in the deployed platform stack
Deploy an Application
Now that your stack is deployed and functionnal, it is time to setup your applications. The platform architecture allows you to manage concurently a number of applications based on different services. One key and central element for every application being the Speech-To-Text (STT) engine.
Once you have gain the abitity to transcribe your incoming audios, you may want to do something with it and setup some functionnality, manage clients and restrict accesses: you will be introduced with the administrator interface.
With applications running, it will the time to effectively connect some clients.
Finally once everything is running you'll have the possibity to access monitoring tools to keep an eye on your stack.
First contact with Platform Service Manager
To manage STTs processes, the platform relies on a specific service : Platform Service Manager. This service allows you to create, update and scale STT engines on your cluster that will be the central elements of your voice-controlled operations.
In the following sections, we will illustrate a number of use-cases base on different usage of the LinTO platform capabilities and how to do it step-by-step.
To go deeper in how the Platform Service Manager works, you can check the dedicated documentation here.
Voice Applications
Voice applications provides a mean to communicate informations using natural language. It relies on a STT engine that transcribe digital audio signal into computer usable data, in that case: text.
STT is an assembly of 3 elements:
- An acoustic model responsible to convert the audio signal into speech basic components.
- A decoding graph / language model that maps those components onto a specific language or set of available utterances.
- A service that wraps those elements and provide a communication API to treat transcription requests.
Set up a LinTO Platform Transcription service (STT)
In the upcoming steps we will:
To manage those elements you may want to go to the Platform Service Manager swagger. It can be acceded at [LINTO_STACK_DOMAIN]/stt-manager/api-doc/.
The swagger interface allows you to execute the request directy in the GUI.
You may altenatively want to open your favorite request tool (Insomnia, Postman, ...) or be ready to type some curl requests.
Create an acoustic model
On the Service-Manager swagger go to the Acoustic Model Management section and expand the Create the acoustic model by modelId. This is the request you will use to create a new acoustic model.
Set a [modelID] and choose between a local reference if the model is already in the stack_shared_folder or an url for the acoustic model. We provide some acoustic models on the here and you can use one of those.
Set the transcription language as specified and you may also want to input a description.
Post your request and if everything is all right a nice code 200 should be returned .
Now your Platform Service Manager knows of its first acoustic model, and you can check it using this command:
curl [LINTO_STACK_DOMAIN]/stt-manager/acmodels
Which should return your newly created acoustic model.
Acoustic model creation needs to be done only once per language. You might however use multiple ones if needed
Create your language model
For the language model, there is several ways depending on usages:
You can start from scratch and create a brand new language model that will only recognize words and sentences that it will be fed with*. It can be suitable for restricted vocabulary but may be limited if user inputs are not strictly defined. It is basicly the case for strict voice command interaction paradigms.
You can start from an already existing small language model which will be enriched with your command sentences*. It's a little more heavy but a more versatile way to make sure the model will recognize a larger array of wording. It is suitable for flexible voice command interaction.
You can use a large existing language model to transcribe unframed speech for purposes such as dictation, real-time subtitling , ... those are large vocabulary (LV) usages. Large vocabulary are designed to be able to recognize the wholeness of a given language.
Why not use a large vocabulary model for everything ? Because the main STT processing bottleneck happen during the decoding phase, larger language model means longer decoding time. It may be overkill to deploy a LV model for a simple vocal command interface.
On the Service Manager swagger go to the Language Model Management section and expand the Create the language model by modelId. This is the request you will use to create a new language model.
Set a [modelID] and choose between a local reference if the model is already in the stack_shared_folder or an url for the language model. If you do not specify any model an empty model will be created.
An empty language model is certainly what you want if you plan to use only strict voice command interaction paradigms based on skill deployments. Language model for command purposes are updated with the command sentences defined within the skills. Learn more
| Usage | Existing language model | Result |
|---|---|---|
| Strict Voice Command | None | STT will only use declared sentences to transcribe. |
| Flexible Voice Command | Small or medium model | STT will use sentences declared as well as current language elements to transcribe. |
| Large vocabulary | Large model. | STT will be able to transcribe natural speech and a large amount of various proper names, location and business specific terms. |
Input a language lang as specified and the [modelID] of the previously created acoustic model. Finaly specify that it is a cmd or lvcsr(large vocabulary) model.
Now your Platform Service Manager has its first language model, and you can check it using this command:
curl [LINTO_STACK_DOMAIN]/stt-manager/langmodels
Which should return your brand new language model.
You can create multiple language models if you intend to have different usages.
Create your transcription service
Now it is time to wrap your STT service up.
On the STT-Manager swagger go to the Service Manager APIs section and expand the Create the service by serviceId. This is the request you will use to create a new STT service model.
STT services come with two flavors:
Offlinemeans that the transcription is done on a audio file. It is used to process voice command.Onlinemeans that the transcription is done on-the-go from an audio stream.
If you want to deploy a voice interactive application, you'll need a offline STT service.
Set a [serviceID], choose a number of replica (the number of instance of transcription, that can be changed later), set the tag as offline and input the [modelID] of your newly created language model.
If the everything is good you will be greated with a 200 and your platform is now able to transcribe some audios.
Once again you can check that your service has been properly created using :
curl [LINTO_STACK_DOMAIN]/stt-manager/services
And that's it ! You have now the capability to transcribe speech.
First access to LinTO-Admin
Your platform just acquired the capacity to process audio files into text and it is time to define what it can do with that.
We can now drop the requests and move to the main administration interface located at [LINTO_STACK_DOMAIN]/.
This is the linto-platform-admin interface. Its goals are to create, manage and monitor your voice controlled applications. If it's your first time using it, it may ask you to enter your administrator credentials. Once logged-in you will be greeted with the main interface.
On the left hand side you have several elements:
Device applications: Is the place to create and manage applications related to static devices. Static devices are basicly device attached to a specific location (e.g. Room 101) and not attached to a group of users. Device application are attached to a single device.
Multi-user applications: Is the place to create and manage multi-users applications. Multi-user application are attached to multiple terminals and require an authentication to be reached.
Devices: Is where you manage you static devices.
Users: Is where you manage users and their accessibility to multi-users applications.
Domains: Domains allow to restrict provenance of web based LinTo clients and allocate slots.
Workflow templates: Allows you to create custom application workflows and save it as a template, through nodered interface.
Tock interface: Is the NLU interface where you can fiddle with how the platform detect intentions, extract information from user voice command.
In this part we will:
Create an application
There is currently two types of application:
Device Applications
This part is for you if you intend to use a static client such as a LinTO Maker based clients or a static android client.
Before creating your application you must register a device.
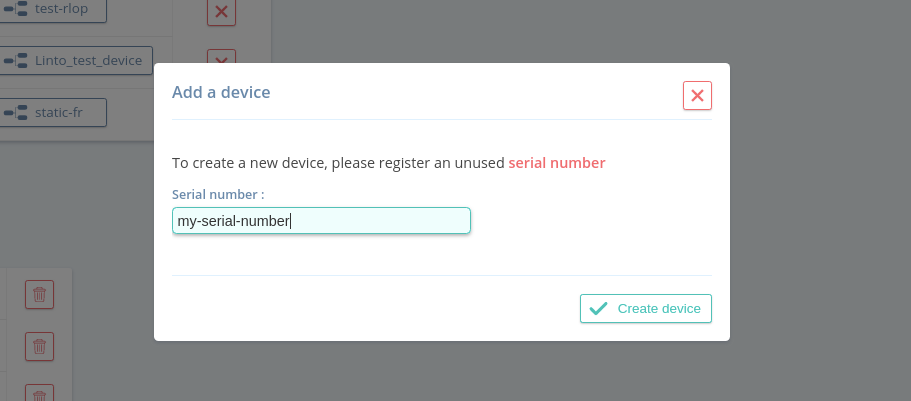
- Go to Devices and click on
Add a device. - On the pop-up window, you must enter a serial number which is the unique id of the device.
- You can now go to the Devices application view and click on
Create a device application - You may fill the App name, its description, select your newly created device. Select the default workflow template, choose your language and select the STT service we created previously, let the streaming and Large vocabulary file fields to none and select Create a new tock application in the final field.
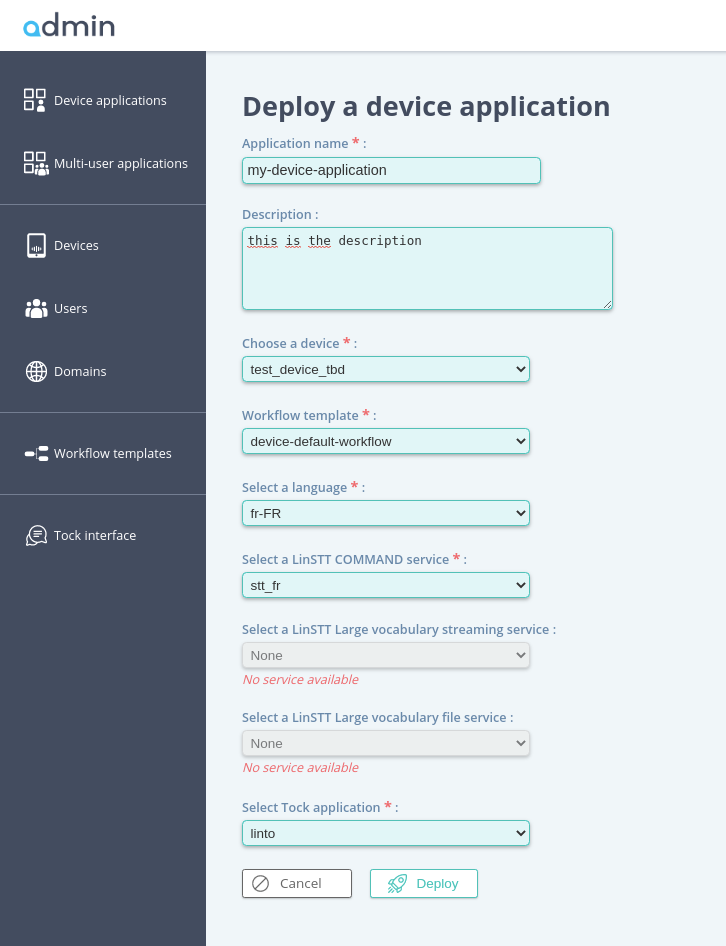
- Tap
Deployand you first application is now created.
You are ready to connect your application's client and customize it.
Multi-Users Applications
This part is dedicated to deploy an application designed to be used by multiple user on Android clients or on a web page for exemples.
- Go to the Multi-user applications on tap the
Create a multi-user application's button. - Enter Application's name, description and select the multi-user-default-workflow.
- Select your STT command service.
- (optionnal) If you have a large vocabulary and/or streaming service you can select them.
- Select "Create a new tock application".
- Tap
Create application.
And that's it, you have a voice command application ready to be used by clients and to be customized.
Connect a client
Connect your LinTO maker client
To connect your Android client, you need to gather the following informations:
Serial numberthat you created for the device.MQTT broker address: The adress should be the stack address[LINTO_STACK_DOMAIN]and the port 1883. Those information are sets in the .dockerenv file used to configure your stack under MQTT Broker for LinTO clients.MQTT passwordandMQTT logincan be configured in .dockerenv under the same section.- Get the
application IDwhich will be used as the communication topic.
Equiped with those information just follow the Raspberry Setup here.
Connect you Static Android Client
Get the informations described on the previous section and enter them in the More Options view on the android connection page.
Connect your Android client
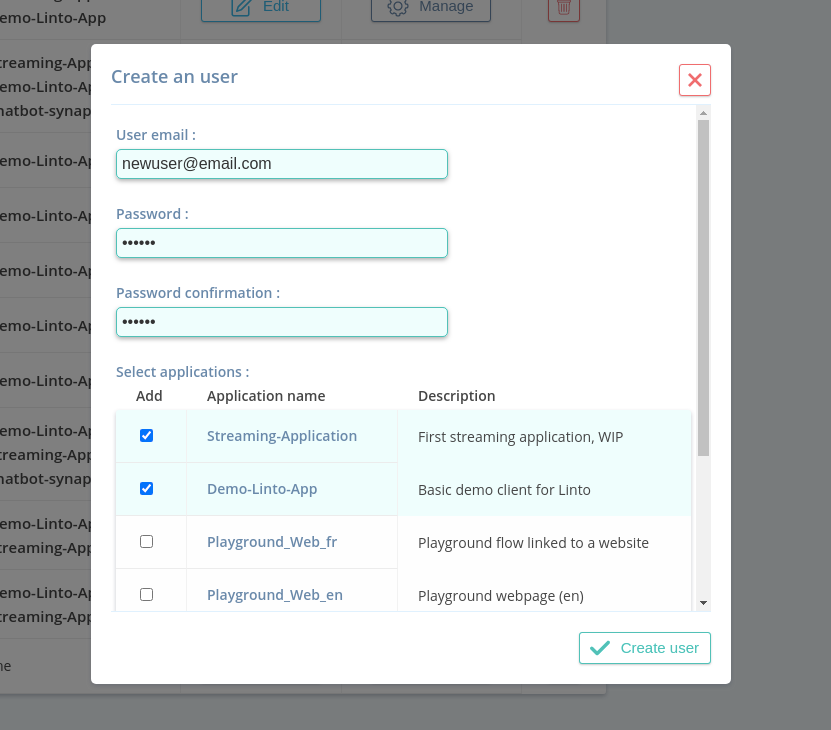
To connect an Android client, you must first create an user account. To do so :
- Go on the Users tab on the admin interface and create a new user.
- Associate the desired applications with your user.
Use the created login/password to connect your client, the application server being [LINTO_STACK_DOMAIN].
Setup your web client
Web client requires a authentication token as well as the domain authorization.
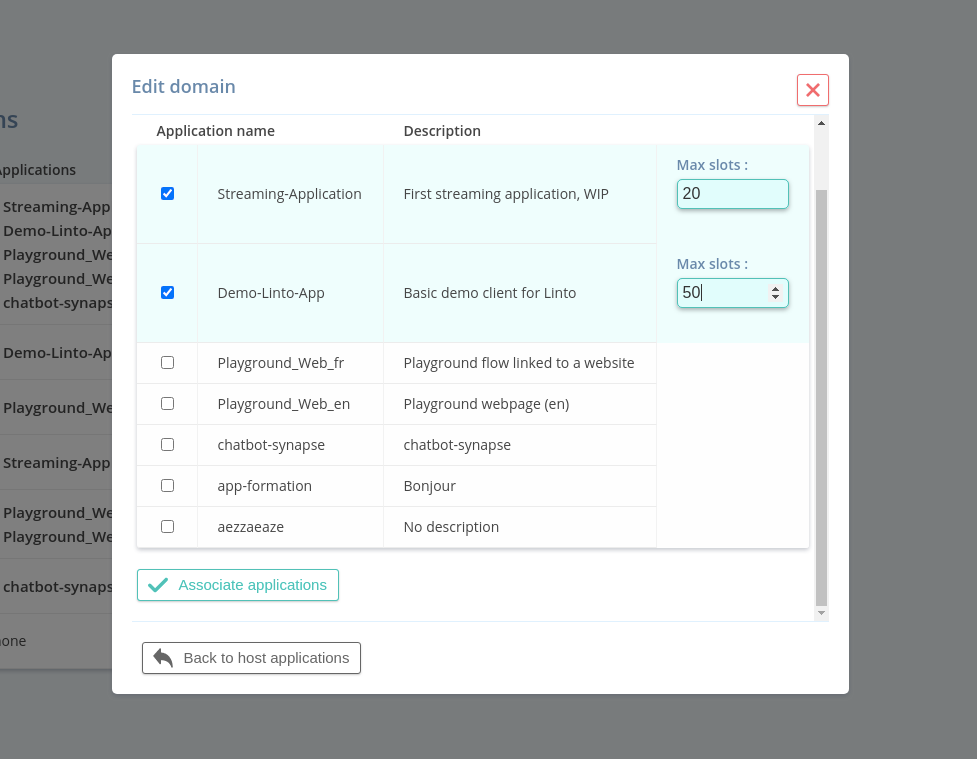
- Go to the Domain and
Add a domain. - Set the Domain url of your web site and create the domain.
- On the newly created Domain click on
Manageand add click onAssociate application. - Select the application(s) you wish to access from your client and set the number of slots. The number of slot is the number of concurrent clients that can access the service simultaneously.
Use the generated Request token in your application to connect your client.
Customize your application
Default application come with limited functionnality. You may want to add more skills or even add your own skills. You may also want to customize or correct the sentences used to trigger a skill.
Select your device application or mutli-user application and click on the associated "deployed workflow" button. This will open the workflow in an embeded nodered interface, where you can customize your application. You can for example add new skills to your workflow, customize dictionnaries or settings.
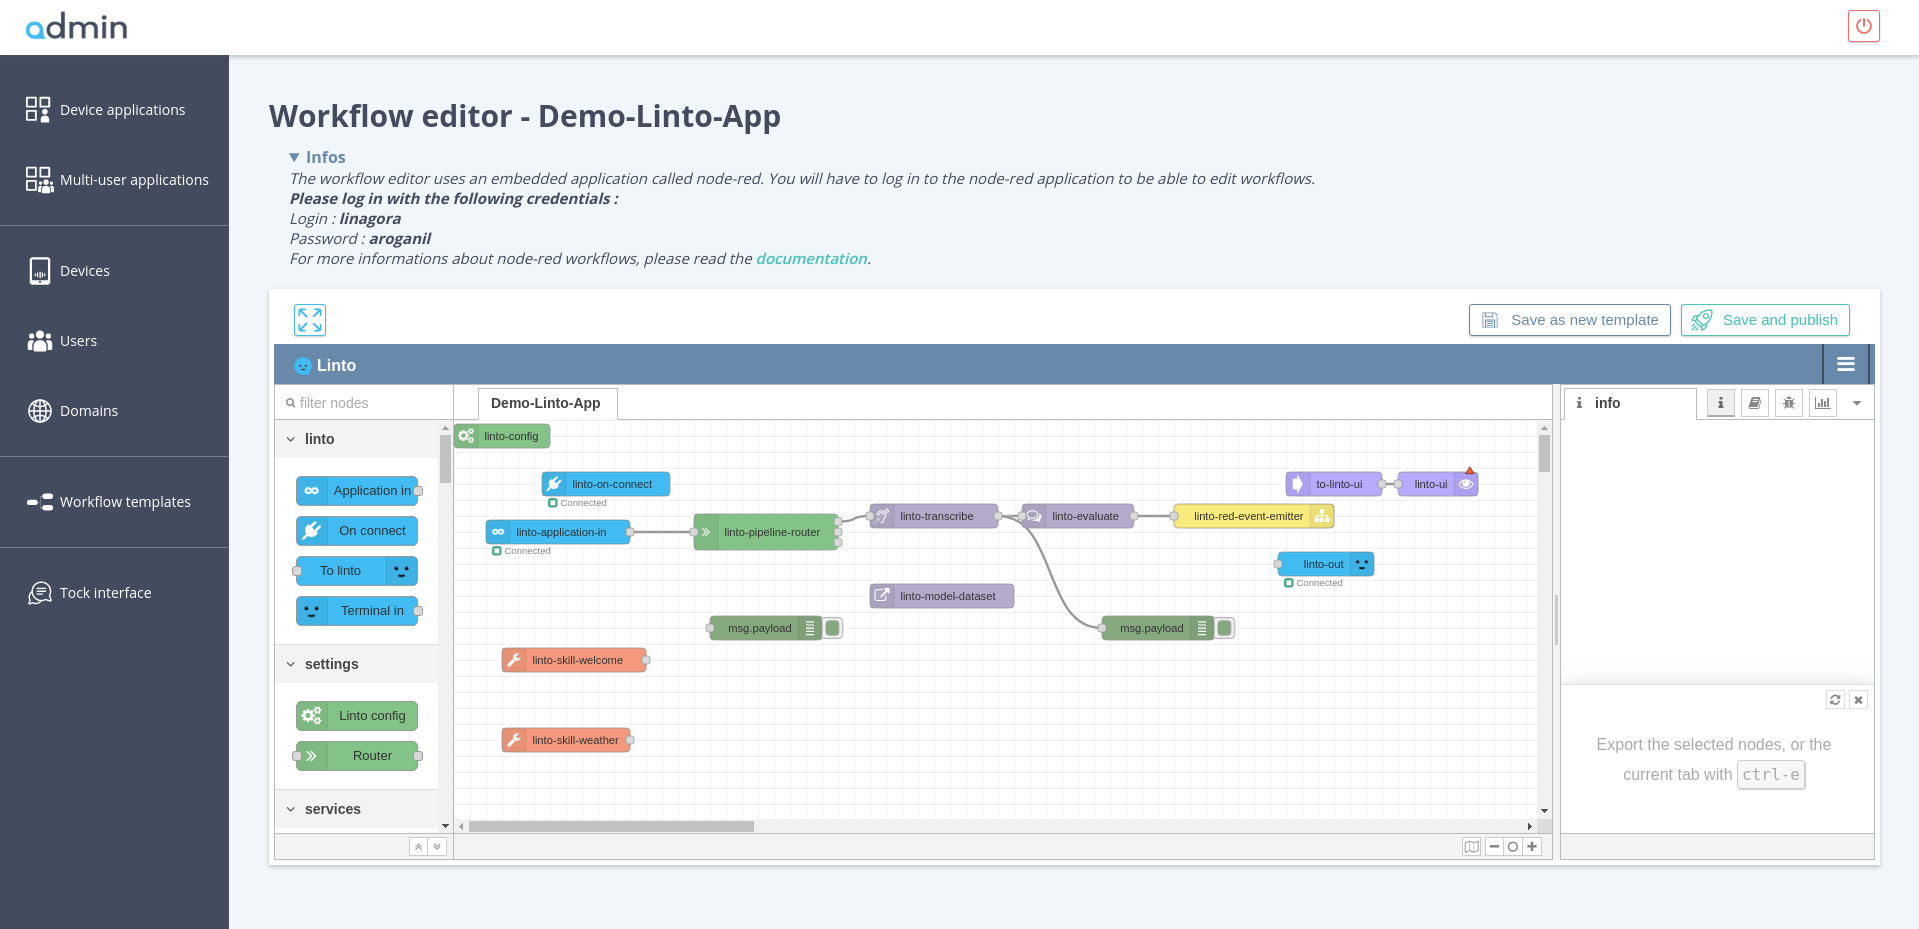
Once you've finished updating your workflow, you can click on "save and publish" to deploy your updates on the business logic server.
You also can edit the application parameters (title, description, services...) by clicking on the "Edit" button on your applications overviews.
NB: Once you've deployed or updated an application, it could trigger the process of lexical seeding and model generation. In this case, you'll see a notification on the top of the interface, giving you the generation process status. While an STT model is in generating process, you cannot access the workflow and update it.
Skills
A skill is a functionnaly of your voice controlled application. They are software blocks designed to link intents detected by the NLU to functionnalities. Formers may be informations fetched on APIs, domotic command, ...
Skill are composed of 2 elements:
- The intent part is a list of sentences for the triggering of the skill.
- A logic part responsible for the underlying processing.
Manage skills
To manage skills within an application, go to the Application panel on linto-Admin (Device or Multi-user) and click on the deployed workflow.
Log in and you are on the node-red interface
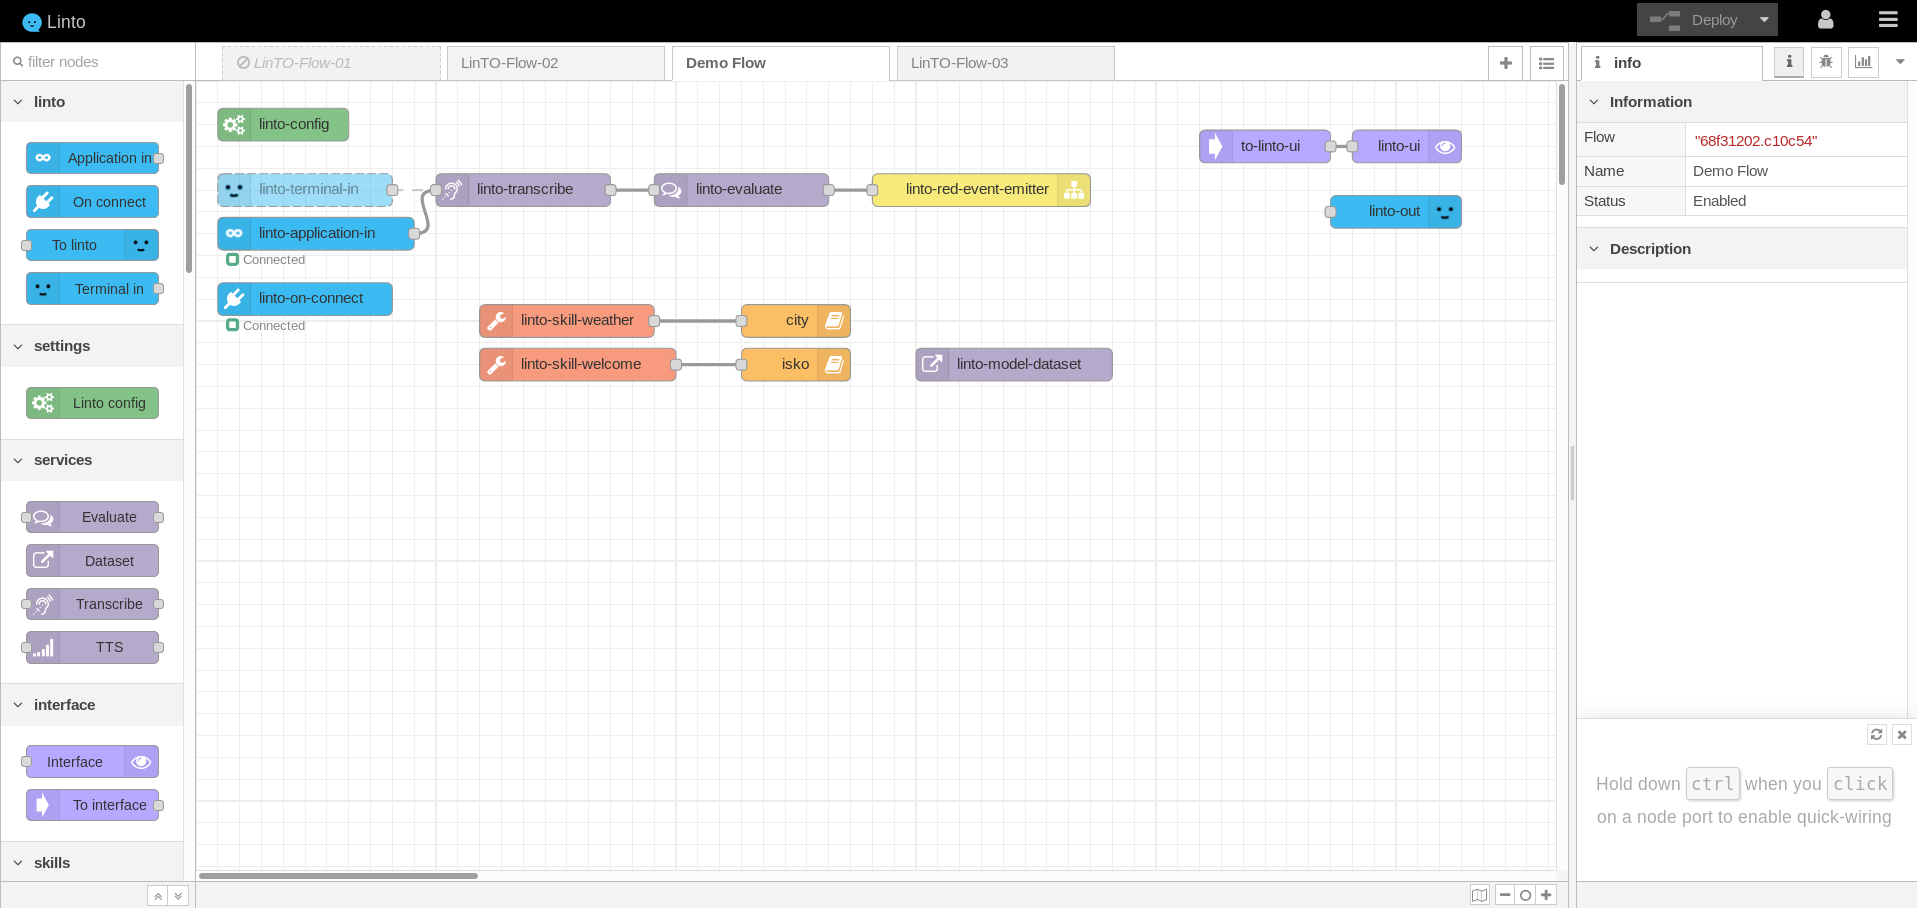
To add existing skills, simply pick a skill on the skills subsection on the left side panel and drag it on the main panel.
Certain skills can be configured by double-clicking them.
Once you have added or removed skill click on Save and publish to save the modifications. Publish will have for effect to render the skill available and add the intention utterances described in the skill to the NLU service.
Create your skills
You want to create and add your own skills ? Follow the Create your skill guide.