Raspberry Pi
Welcome to the LinTO raspberry Maker tutorial. The goal of this page is to build from scratch a pipeline to create a voice controled interface base on a Raspberry client.
Overview
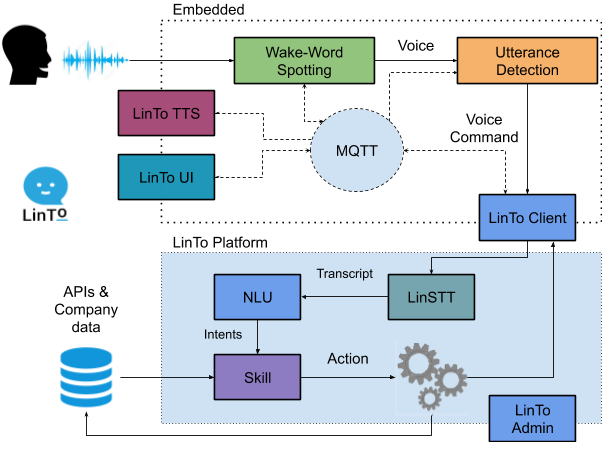
As much of existing voice interfaces, LinTO is made of a bunch software elements linked together; each element having a very specific task to fulfill. We can make a distinction between two families of elements:
- On device softwares: Those are embedded and running directly on the RPi.
- Server-side softwares: Those are software running on a server, shared for all devices.

Server side services are grouped under the name LinTO plateform. This includes Text-To-Speech (TTS), Natural Language Understanding (NLU), Skills and fleet management (LinTO Admin). See LinTO Platform
Embedded softwares :
- Wake-Word spotting and Utterance detection are grouped under a module named LinTO-command which is responsible of detecting the wake-up-word and detect the start and end of a user voice command.
- LinTO TTS is the embedded Text-To-Speech engine.
- LinTO UI is a the placeholder GUI that display LinTO on the device screen.
- LinTO Client is link between the device and the server.
Those modules are communicating with each others using a MQTT broker.
Ok, but do i build it ?
Setup
In order to have a functionnal LinTO you will need several elements:
- The hardware,
- The operating system,
- The server-side services,
- And to link those elements together.
Hardware
Raspberry Pi
We have tested the builds on RPi model 3B, 3B+ and 4B.
Touch Display
You will need a touch display to display and interract with your assistant.
We used the 7" touchscreen monitor for Raspberry
Microphone and speaker
Without it the assistant will ignore you and stare at you with empty eyes.
You can use whatever device you find suitable. We used Jabra Speaker, basic usb and jack microphones/speakers and the ReSpeaker 2-Mics Pi HAT.
Memory card
You don't need much space 4GB/8GB microSD card is enough.
Don't forget the power supply and plug everything together, a case is always a good idea to hold everything together as without it, it may look messy.
You now have a soulless assistant. Let's give it some matter.
Operating system
The operating system for LinTO is based on Raspian Lite (Stretch and Buster).
Two options here:
- Build the OS image using the os-generator.
- Download the last image Here
Once you have downloaded or generated your image, burn it on the microSD card.
Services
In order for the assistant to work, you must deploy the LinTO platform. Follow the instructions here
At the end of this step you should have:
- The IP and port of the MQTT broker.
- The username and password required by the device to connect to the platform.
We are almost there.
Connect the links
Now that both side are sets up, they need to communicate between each other.
Those following steps are temporary as the enrollment service is still in development. Bear with us.
To configure the LinTO client you need to edit the LinTO.json file located on the device: /home/pi/LinTO-client/lib/terminal/linto.json.
#If the LinTO.json file does not exist you need to copy the LinTO.sample.json file.
cp linto.sample.json linto.json
- First set the Serial Number (sn). This will be the unique device ID used to communicate with the platform.
- Enter the server MQTT address and port under the mqtt section (host and port) as well as the username and password.
- (Re)Boot the device.
- Open the LinTO admin interface on a web browser, click on
Add a LinTOand enter the serial number.
The device should appear under "Not Associated LinTO"
Now, we need to associate the device with a room. Go to Meeting rooms-> add a room. Set the room name and id and select the device SN. Select the flow pattern for the new device.
You can manage the skills using the flow patterns manager.